Introduction to Linked Lists
What is data? Data is any fact or statistic that can be used to describe something. It can be qualitative or quantitative, and it is found all around us. Data is the backbone of everything that we do, and the field of computer science aims to better understand and organize it on a large scale. One of the ways that they do this is through the use of data structures. At its core, data structures are specialized formats for organizing, processing, and storing data.
One of the most basic data structures that a new programmer learns about is an array. Arrays are a list of items that can be stored inside of a variable, and leverages index positions to access specific parts of the data. Another type of data structure is a linked list. Linked Lists are very common in the world of data structures, and understanding linked lists is key to excelling in technical interviews.

In this example, the pointer variable is null which makes this a linear linked list. The final node does not point to anything and thus is the last item in this linked list. A circular linked list has the final node pointing to the first node, thus connecting all the nodes in the list together.
Navigating a Linked List
In an array, you can access specific values by indexing to that position in the array. However, in a linked list you cannot access a specific node just by knowing the node’s pointer address, you can only access a node by traversing it starting from the head (the first node in the list) to the tail (the last node in the list).
An empty linked list is a list that doesn’t have any nodes or associated values. On the contrary, a non-empty linked list has at least one node.
Linked List in Code
Now that we understand the theory behind a linked list, let’s dive into how we can build out a linked list with code. This example will be built in JavaScript, however, it can be replicated with the programming language of your choice.
class Node {
  constructor(data) {
    this.data = data
    this.pointer = null
  }
}
The code above builds out a simple node class, with each instance of the class taking in the value that will be held within that node. The pointer is currently set to null as it has not been connected to any other node yet.
Now let’s take a look at how we can build out the linked list itself. The code below might look overwhelming right now, but it is actually quite simple when we break it down.
class LinkedList {
  constructor() {
    this.head = null
  }
  addToTail(data) {
    const newNode = new Node(data);

    if (!this.head) {
      this.head = newNode;
    }
    else {
      let current = this.head

      while (current.pointer) {
        current = current.pointer
      }
      current.pointer = newNode;
    }
  }
}
When an instance of the LinkedList class is created, it is initialized with an initial head value of null. There are no nodes in this empty LinkedList as they have to be added, so there is currently no head value.
It is created with a single-class method called addToTail, which adds new nodes to the end of the linked list. It takes a single parameter, data which is the value that is to be added to the node.
The method begins by creating a node and storing it inside of a newNode variable. This node is an instance of the Node class, and takes in data as an argument. This data is the value of the node that we discussed earlier.
Next, the method checks to see if there is a head in the list already. If there is, that means it is a non-empty list and the code will enter the else block. If it is an empty list, then the head is created with the newNode variable being assigned as the new head node.
If the code enters the else block, that means that there is already a head node in the linked list, and new nodes simply need to be added to the end of the list. A current variable is declared that is assigned to the head of the current node. The code then enters a while loop that will continue to add new nodes until we get to the end of the list. Remember, current.pointer really refers to this.head.pointer, with the pointer method being declared in the Node class. While there is a pointer value, the current node gets set to that value, and it will continue reassigning the value of current to each subsequent node in the list. Once current.pointer becomes a falsy value, it has reached the end of the list, and the new node can be added to the bottom of it.
printAll() {
  let current = this.head;
  while(current) {
    console.log(current.data)
    current = current.pointer
  }
}
We can also create a simple method that will traverse our linked list and print out the value of each node. This method sets the current node value equal to the head node at first and will continue to run as long as current is a truthy value. After the current variable is logged, it will assign current to pointer, which is the next node in the list. This will continue until pointer becomes falsy, which is when we get to the end of the list.
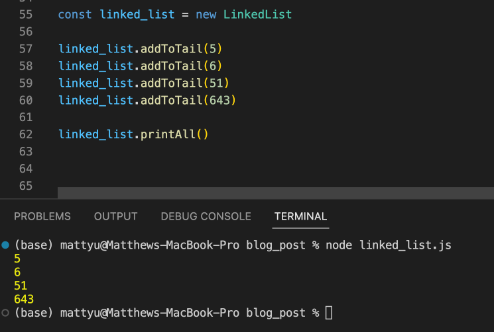
With our code now complete, we can leverage the addToTail method to add new nodes to the list, with the printAll() method being used to console.log the values in each node of the list.
Congratulations, you now understand what a linked list is and how to build it out with code! A linked list is just one of many types of data structures, and the best way to understand them is to continue to learn and practice as often as you can!
